Paw Patrol: Scene Three Food

And wait you did! Holy cow have the last few months been crazy! I haven’t even finished Ms M’s party posts and we have had N’s party, pumpkin carving and are well on our way to Thanksgiving!!! Yikes!

Well, lets see if we can’t get back on track!

Where were we? Ah, yes, FOOD!!

Well first you have to welcome your gets to partake in the food!!

Hot Dog Bar (3)

And being that these are kids coming to this party, they need to keep hydrated, and may need a reminder to wash!

Drinks

And of course there have to be appetizers. The mini Steam’s always have fun helping me come up with the ideas for the names. This time we had fun with the serving too. We picked up a few dog bowls from the local Dollar Store.

Appetizer Table

Here’s the run down….

  • Veggies & dip – Ruff-age
  • Mellon balls – Fruit Kibble
  • Pop corn – Pup Corn
  • Potato chips – Paw-tato Chips
  • Cheese curls – Puppy Tails
  • Puppy Chow – Puppy Chow

Appetizers

Appetizers (3)

Appetizers (2)

Appetizers (1)

The cupcakes have to be THE easiest cupcakes I have EVER done!!! I am not kidding. Slap on some frosting (Ms. M chose green because Rocky is her favorite), a regular Oreo for the main paw pad, and 3 mini Oreos for toes.

Pup Cakes

Dinner was a lot of fun too. We had a hot dog and bratwurst bar.

Hot Dog Bar (1)

Hot Dog Bar (4)

Besides the hot dogs we had some of Ms. M’s other favorite foods too..

  • Potato salad – Paw-tato Salad
  • Blue Jello – Water Bowls
  • Mac and cheese – Dog Tails and Cheese

Dinner

And last, but not least, were the GAMES!!!!

Posted in Precious Parties | Tagged , , , | Leave a comment

Paw Patrol: Scene Two Decorations

The decorations were so much fun for this party. The hardest part for me was to decide which decorations I was going to do, and which weren’t going to make the cut. It was starting to get really busy, so anything had to be simple to make.

As always I like to welcome the party guests before they even get to the house with the party theme. I cut a paw print template out of some card stock and then used it as a stencil for sidewalk chalk.

Front Entrance

I made up this sign for the front door. And yep, I used some of the same text as in the invite. But, really, I couldn’t resist re-using this phrase. And keeping with the fast and simple – no cutting, just print and tape to the door! WIN!

Front Entrance Sign

Inside I always set up the favor bags inside the front entrance. Ms. M liked the way the invites turned out so much, I decided to give the favor bags the same treatment. Excepting there was one favor bag for each dog in the show. This worked out perfect as there were 6 dogs and 6 kids coming to the party. And Ms M thought it was awesome because she turned 6 too!

The sign above the bags was simply the framed print that always hangs there wrapped with red gift wrap and another Paw Patrol scene taped over top.

Favor Bags

The other great thing, was the party was a week after her actual birthday. She got all the cars for her birthday, so we put them around the house as part of the decorations. My poor children are now so used to me taking pictures for the blog. How can I tell? Well, at the party this happened

Friend: Ooooh! Can we play with Marshal?

Ms M: Don’t touch that! Mom! Have you finished taking pictures yet?

Me: Yes, dear.

Ms. M: Ok, we can play with Marshal.

Poor kid!

I also took the dogs logos and blew them up and posted them around the house in various places.

Signs

Smaller versions of the logos were hung over the appetizer table and over the dinner table. But of course I didn’t get pictures of those.

I had really wanted to make a fire hydrant. But that did not fit the simple and fast requirement. I did however printout a PICTURE of a fire hydrant and put one on both bathroom doors. Oh, yes I did!!!!

Wait until you see what we did for the food!

Posted in Precious Parties | Tagged , , , | Leave a comment

Paw Patrol Party: Scene One Invitation

Ms M Loves Paw Patrol. And I mean LOVES Paw Patrol. She is very frustrated that I can’t just turn on the TV and have it on.

It was not surprising then what when I offed Paw Patrol as a party them she very enthusiastically agreed. So enthusiastically, in fact, I am not sure my ears have yet recovered.

There are tons of great ideas in blog and Pinterest land. But I couldn’t find an invitation that I liked. So I kept it simple.

Rocky is Ms M’s favorite dog. The card was so simple it needed some bling so I used some glitter paper. Ms M and I couldn’t decide which version we liked better so we make both.

Paw Patrol Invitation

The inside of the invitation was a scene from Paw Patrol that I added the invite text over top:

All Pups on Deck!
It’s time to Paw-ty!
Come! Sit! Stay!
And celebrate XXX’s Xth birthday!

Green means go to the XXX’s house
ADDRESS HERE

You know you’ve got to fly on
DATE AND TIME HERE

No Party’s too big, no pup’s too small
But please RSVP and give a call (or  email)
PHONE AND EMAIL HERE

Next up: Scene Two Decorations


Posted in Creative Cards, Precious Parties | Tagged , , , , | Leave a comment

QOV 4 & 5 for 2016

Now remember I needed to get 3 quilts done in a week. And keep in mind I also have a full time job and two mini Steam’s to take care of. So a few days really only meant a few hours that I could sneak in after getting the minis to bed.

The first of the three took me several days to get done, but it was sooooo worth it! But now I only had a few days left to get the second two quilts done.

As I opened the 2nd quilt I said a little prayer asking for a quilt that really needed edge to edge (E2E).

QOV 2016-5

YES!!!! THis quilt had far to much going on and no quite spots for fancy quilting to show. In other words – it was perfect for E2E.  And look at that beauty! It’s gorgeous!

I borrowed a panto from a friend that is just perfect for QOV quilts. It has eagles, flags and stars. But try as I might I couldn’t get a picture that would show off the quilting.

What you say? I could have just taken a picture of the panto itself? Why, that is indeed a brilliant idea! But, couldn’t you have told me that BEFORE I gave the panto back? Oh well. You’ll have to use your imagination.

The awesome thing about this, the quilt was only on the frame for 1 DAY!!!!! It might just be possible to finish all three!

So I sent up another prayer that the 3rd quilt would be a E2E quilt.

qov 2016-4 (3)

Ok. This one was close. Yes I could do custom on it. But there was enough texture that I was worried it wouldn’t show. It was a hard decision, but with a deadline looming, I decided to do the same panto that I did on quilt #2.

And this picture… that’s after the quilting. You couldn’t see it. So, I am thinking I made the right call.

I tried to get some pictures on the back of the eagle and flags, but the back was the same fabric. This was the best I could get. You can sort of see the eagle on the left, and one of the flags on the right.

qov 2016-4 (7)

And I did it!!!! 3 quilts in one week. I got them delivered in time to get bound and awarded.

Now I still need to catch you all up on the birthday party!!!! Wait ’til you see it!

Posted in Quintisential Quilting | Tagged , , | Leave a comment

QOV #3 for 2016

Oh boy! Do I have some catching up to do or what?!!!!

Things have been really busy this summer. Too many hours at work. A few camping trips. A awesome birthday party for Ms M. Several QOV quilts for a special presentation this August. And a wonderful 4th of July.

Where oh where to start?

With the quilts of course!

There is a big presentation scheduled here in the middle of August. I had three that needed to be done by the middle of July so that there was time to get them bound. I have had these quilts for a while, but haven’t been able to get to work on them. So of course 1 week before they were due I got started. 3 quilts? 1 week? Um, sure!

When I get the quilts they are all folded up in a bag. So I don’t really know what I am getting. I was really hoping for 3 that needed an all over, because seriously, 3 quilts + 1 week does not = CUSTOM.
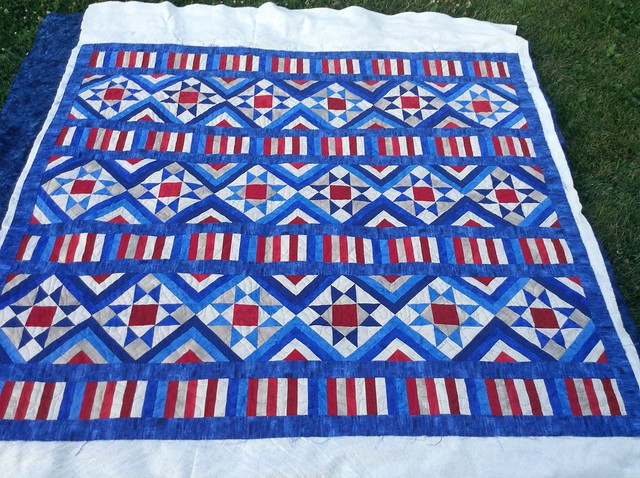
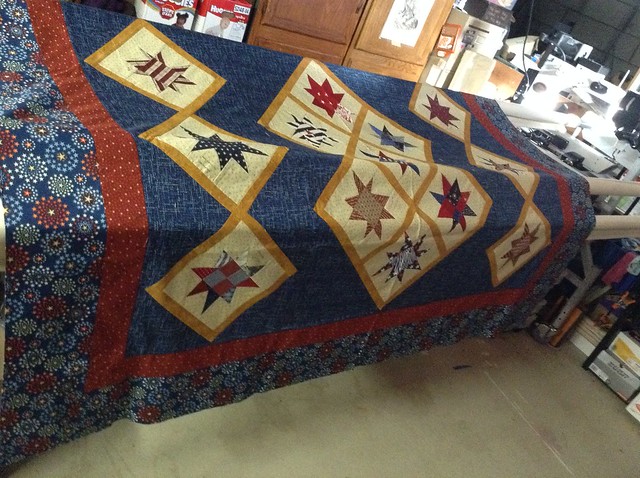
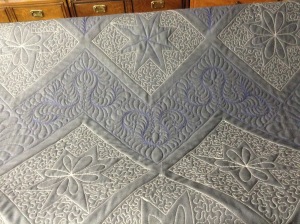
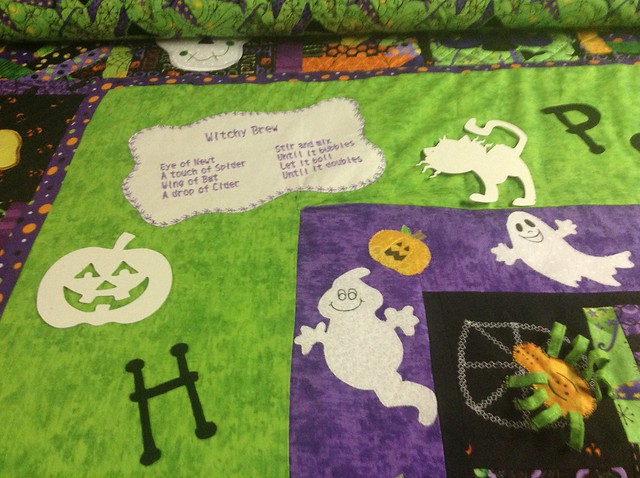
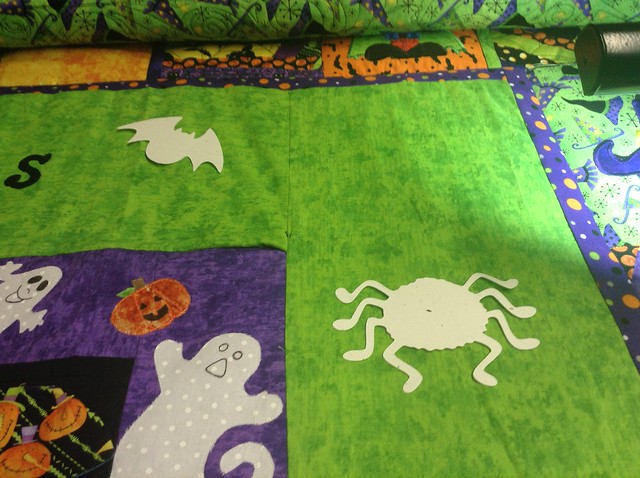
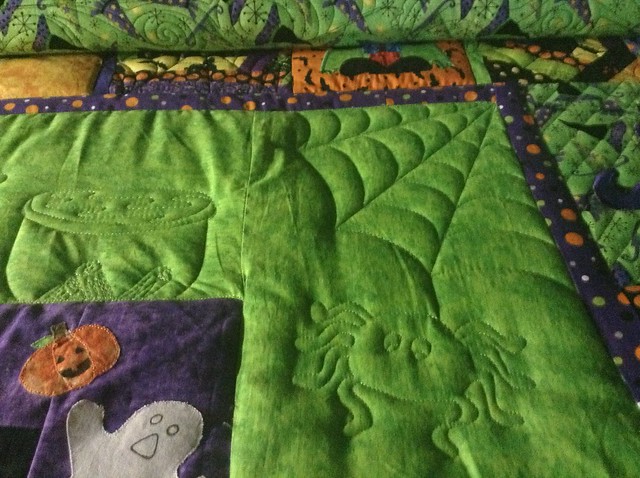
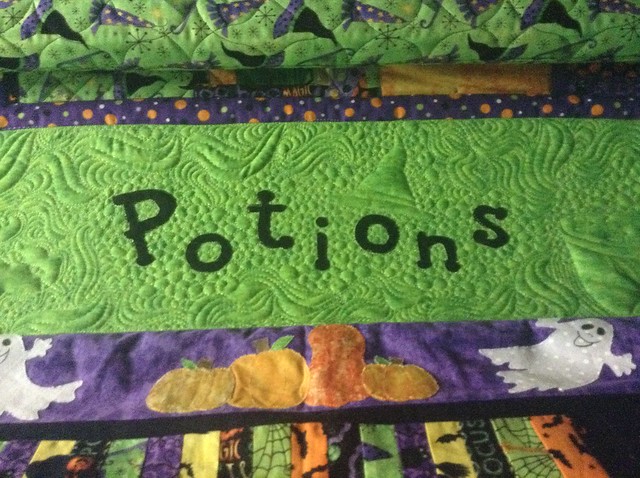
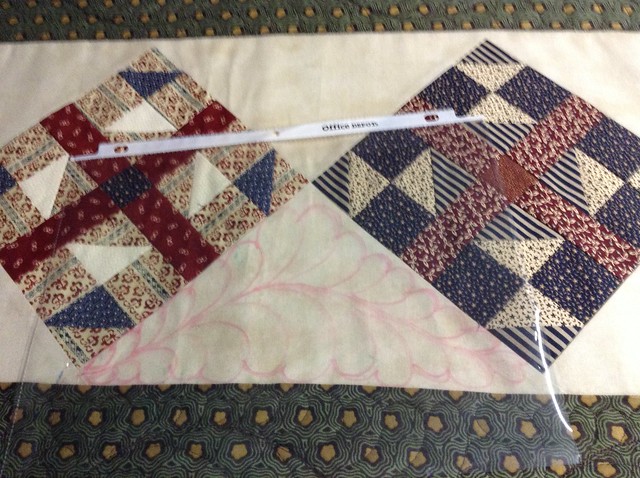
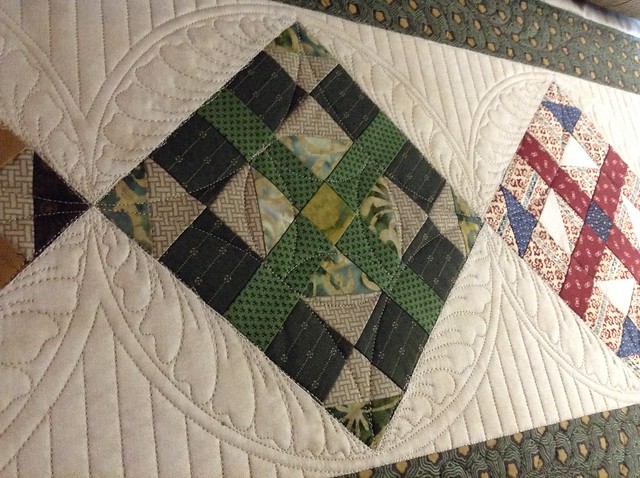
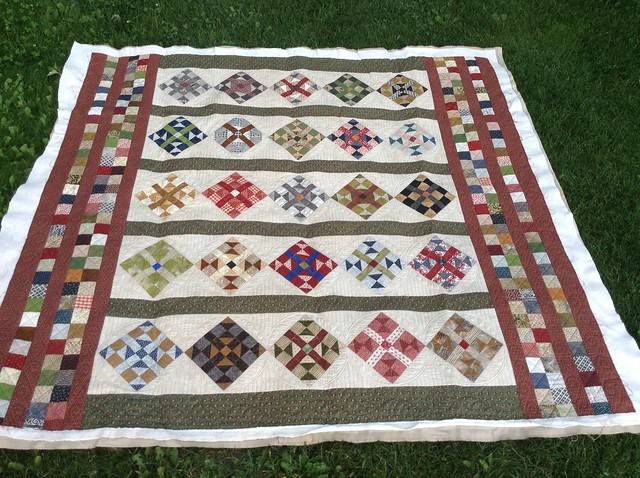
Then I opened this…

1 Top

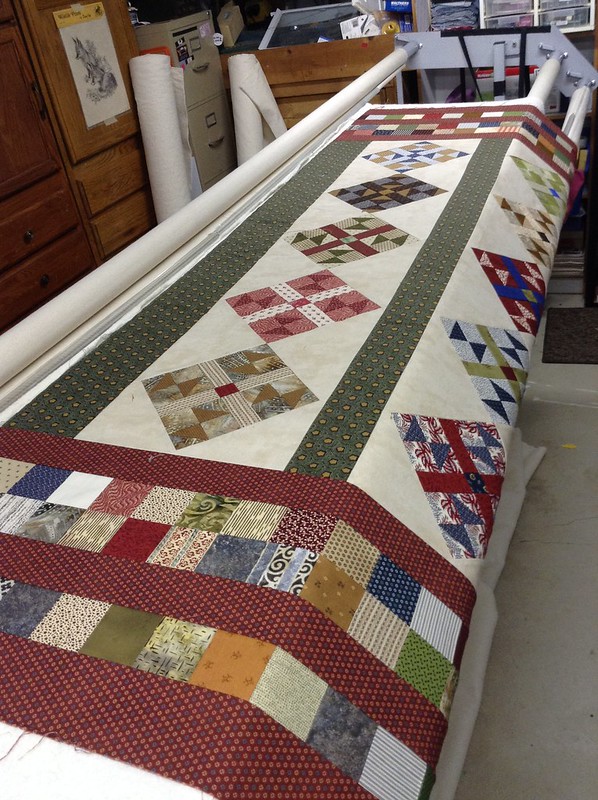
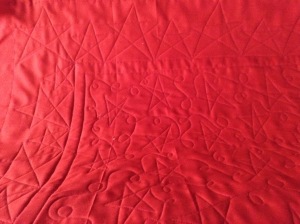
Ohhhh, look at all that white space just calling for custom. I just couldn’t do an all over on this.

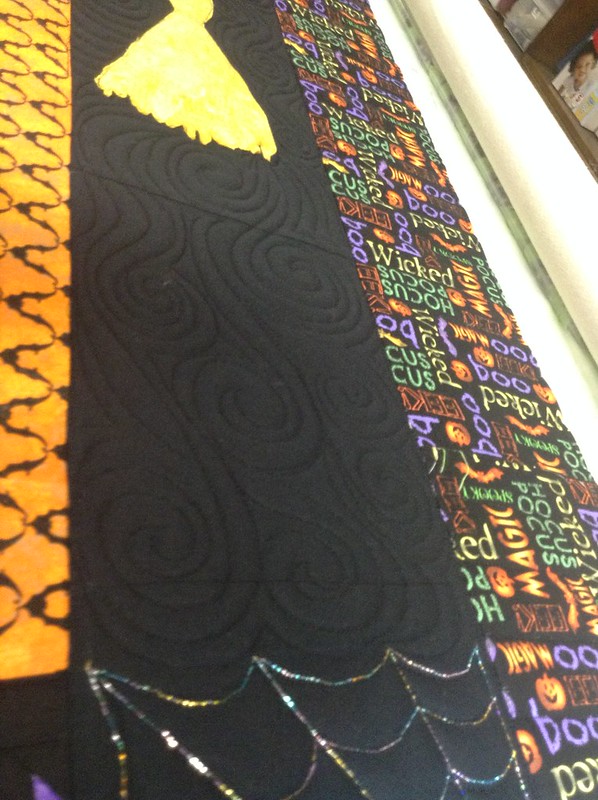
I decided to worry about the block strips later and all their white space later. The side borders weren’t going to show anything. So I did some simple Xs and swirls. The green sashing got some undulating feathers.

2 Sides and sashing

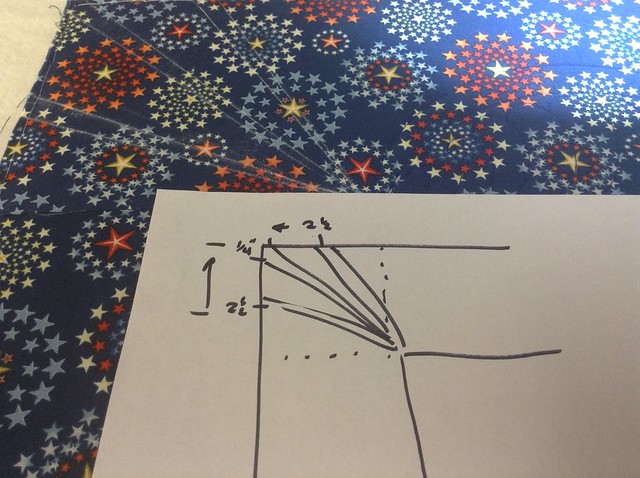
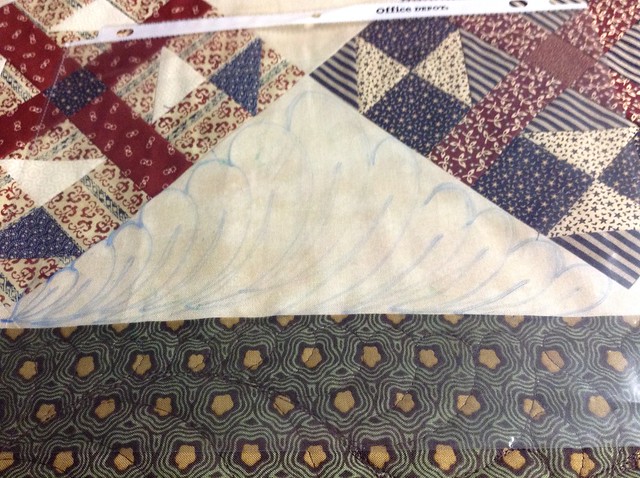
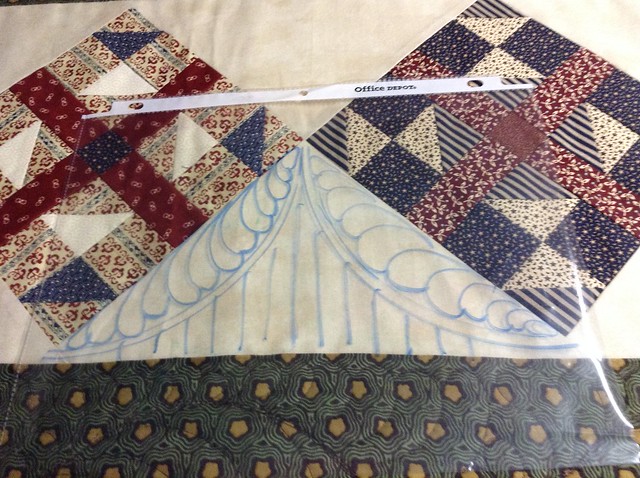
With those done it was time to determine how to treat the block strips. Nothing was really jumping out at me. So I broke out the sheet protectors and started drawing. I needed something that looked good but could still be done on a time budget.

Option 1: Single feathers.

These I could do SUPER fast. And they would look really nice. But, they weren’t speaking to me. And, there was nothing from this that I could pull into the blocks except to maybe stitch in the ditch the piecing. Dang, that was going to be a LOT of ditch work.

3.0 Audition (1)

Option 2: Mirrored Feathers.

This would require only minimal marking. Just a line to aim the feathers to. Hmm. Still not quite right. Again, no help inside the block.

3.0 Audition (2)

Option 3: Arched feathers.

This would require me to mark the spines.  It was far to similar to what was done in the green sashing, and it didn’t really pull the rest of the piecing into the block. Hmmm.

3.0 Audition (3)

This quilt really was screaming for a secondary pattern.

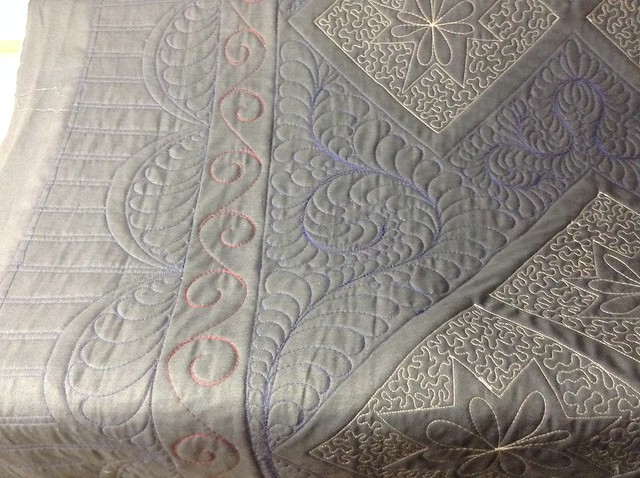
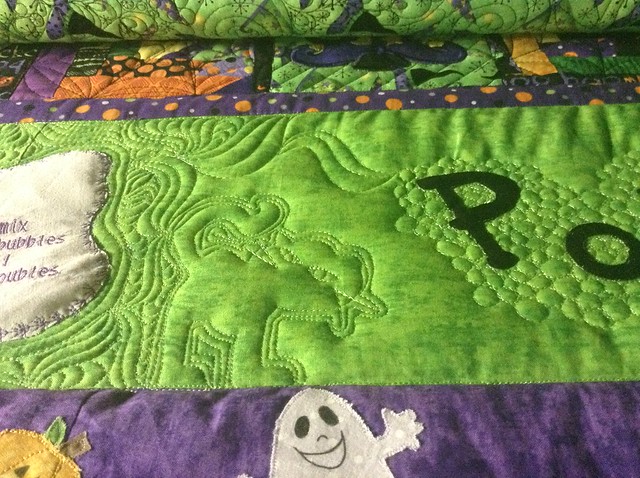
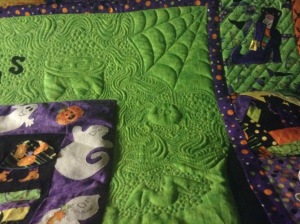
Option 4: Circles & Piano keys

3.0 Audition (4)

Now that was screaming at me!!! SQUEEEEEE!!!! This design. THIS design. This DESIGN!!!! Dang, look at all that ruler work. This was going to take a lot of time.

But really. It had to be done. I still had no idea what to do inside the blocks. But this. THIS is what needed to be done in the white space.

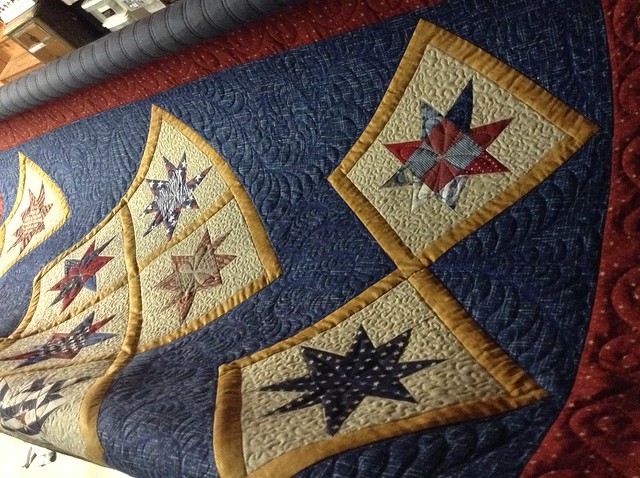
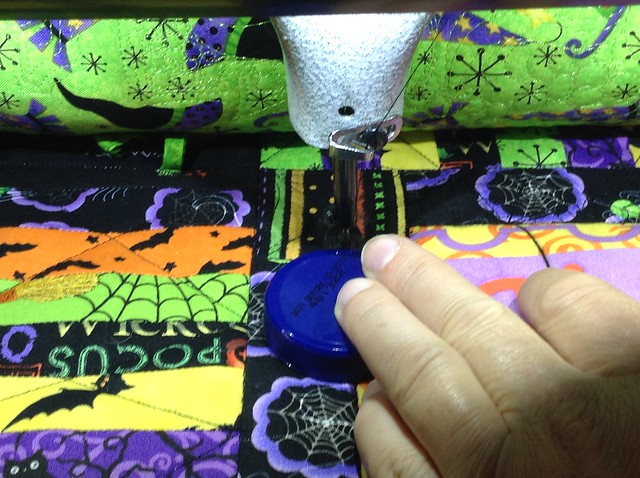
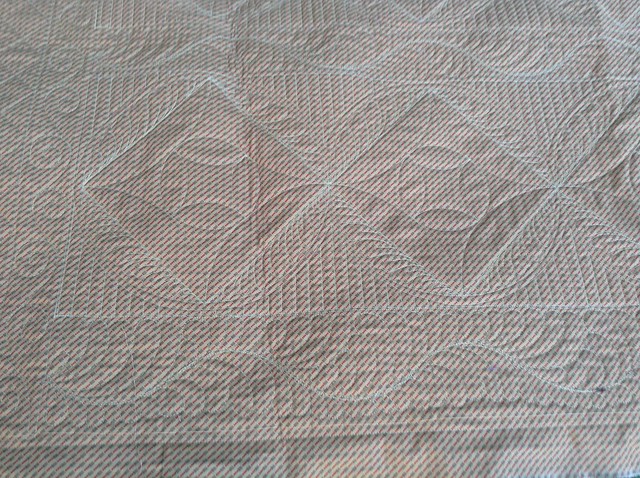
So first to sew the circles. Bonus, I get to use my new circle templates!

3.1 inner cicrcle

To make these faster, I did not do each circle individually. I did all the bottom arcs working right to left. Then I did all the top arcs working left to right.

3.2 inner circle

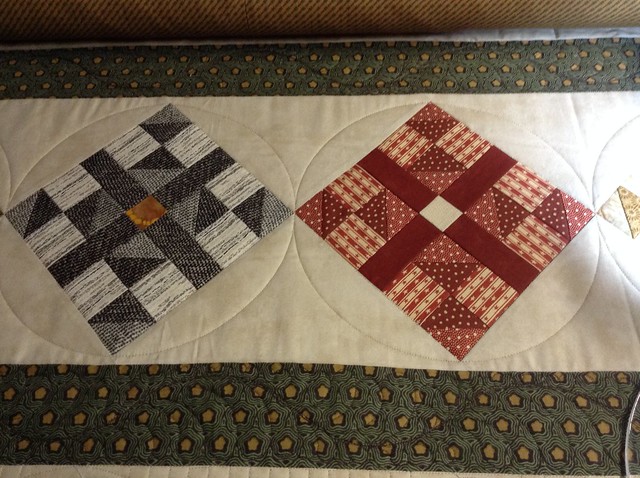
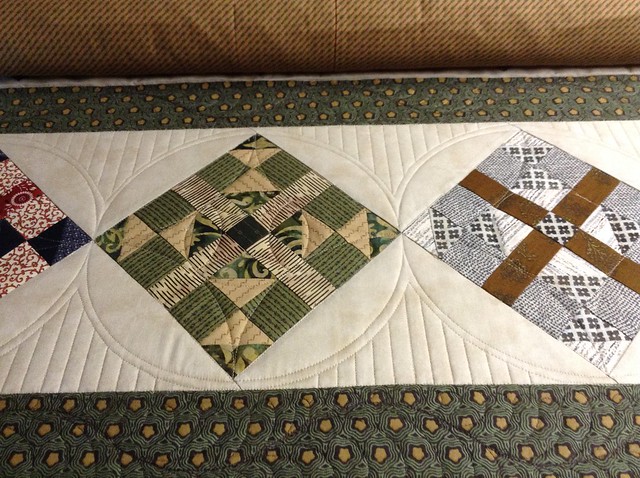
Then I echoed the archs. And did the piano keys.

But while I was doing the piano keys inspiration struck for the blocks themselves!!!!!! I could continue the arc inside the piecing for almost a orange peel. And then use a smaller template and repeat the same idea inside the block. IT WAS PERFECT!!!! It wasn’t too distracting on the piecing. It carried the design into the blocks. And it was going to be SIGNIFICANTLY faster than ditching each block. I LOVED IT! Bonus, I could to all of it with out any additional thread cutting. Just keep working my way left and right!

3.3 Inner circles

Finally I did the feathers in the open arcs. Again, I did the bottom arc working right to left. And the top arcs working left to right. This allowed me to do each row very very few thread cuts. Unless I ran out of bobbin thread it took only 1 cut. My pianio keys are not pretty working left to right. So for that I had to cut and go back to the right side of the quilt.

3.7 finished design

3.5 Full design

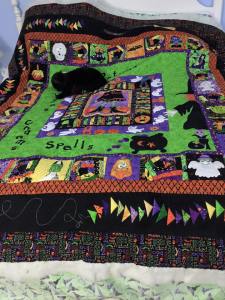
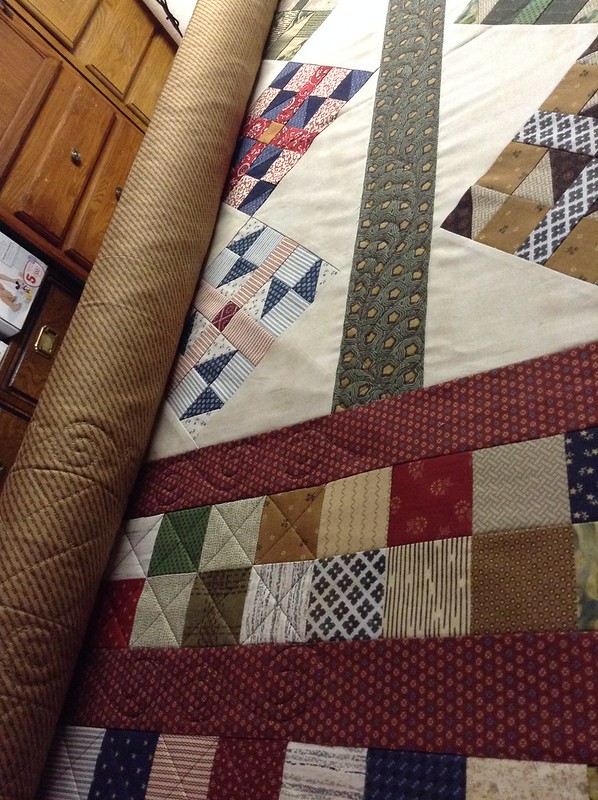
This is one of those quilts that I wish the back was less printed. It would have made an awesome “2nd quilt”

Back (1)

Back (2)

Back (3)

9 Finished (1)

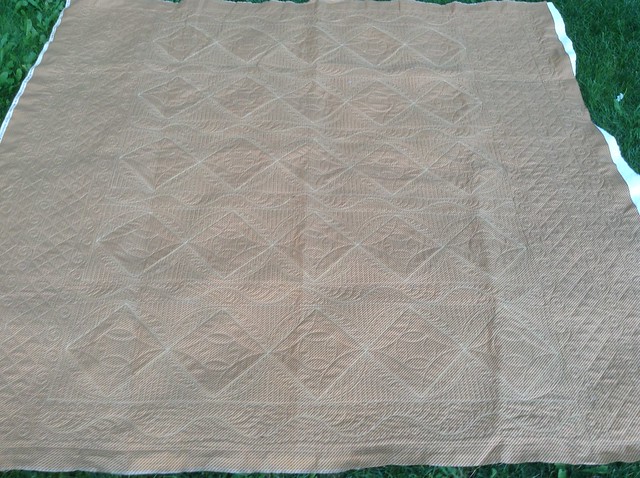
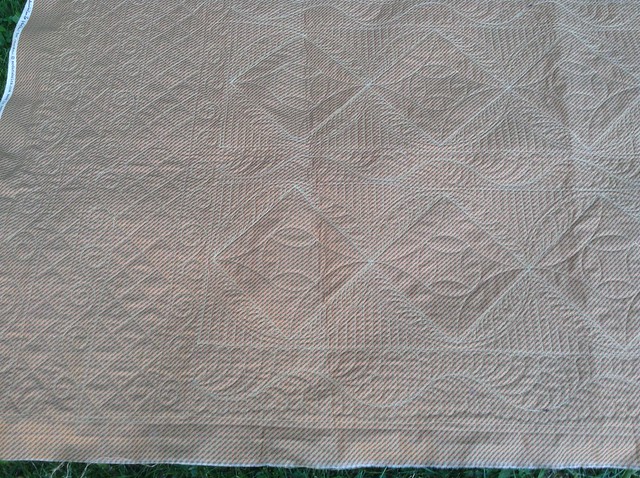
This quilt was really hard to fold up and send off for binding. We had a good thing going. I love it when the quilts speak to me. It feels like we become friends. And this quilt and I had become good friends. I hope its new owner likes it as much as I do.


Posted in Quintisential Quilting | Tagged , , , | 8 Comments

Dutch Garden

Last year we purchase a new hard side camper and I made both mini steams quilts for their bunk beds. But I never got around to making one for our bed. The space where our bed is very dark, so I wanted something to lighten up and cheer up the space. But at the same time it couldn’t be too light because, well, we’d be camping and it’s going to get dirty.

I knew the quilt would have to use stars. Star blocks are by far my favorite block. But I am not a fan of quilts where every block in the quilt is the same block. I like sampler quilts and quilts that mix it up some.

I also really wanted to be able to do the whole quilt top from stash. No fabric purchased. But quite a while ago I had bought 1/2 yard cuts of about a dozen or more blue and yellow floral fabrics. That should do it. I just would need to find some solid(ish) fabrics to fill in.

And as with almost every quilt that I do I want to try something new. I have never done a dresden plate quilt before and I love them. This seemed like a good place to try them out.

Finally it had to have applique. I love love love applique.

After looking for a patern and hunting thru the internet, I couldn’t find anything that fit the bill. So I started playing around in EQ7. After several (dozens? Hundreds?) attempts, this is what I came up with.

Dutch Garden Layout

I still haven’t decided what I am going to do in the last outer border. I’d love to have solid fabric and then just mimic the applique in the quilting, but I don’t have enough fabric that reads solid to be able to pull that off. So I am going to wait and see what I have left from my yellow and blue stash and figure it out as I go.


Posted in Quintisential Quilting | Tagged , | 1 Comment

Stepping into a Mothers Day Gift!

Uggggg! Mother’s Day totally snuck up on my this year. I was planning on taking the kids to a diy pottery place to make a gift for their Grandma. Alas! They wouldn’t be able to put anything we made into the kiln until next week.

Drat!

So now I need a functional homemade gift the kids could do and have it ready in one day.

To the rescue…….Pinterest!

Luckily I had a board made with fun gift ideas. One of those ideas were stepping stones. So last night we went shopping for supplies. Instead of buying a kit for $20 per stone (YIKES!), we bought just the supplies.

  • 60 lbs of quick set concrete (enough for 6ish stones) – $6
  • 2 hexagon forms – $9
  • Assorted glass and marbles – $15

So for less than 2 kids we bought supplies that should make about 6 stones!!! Sa-weet!

This morning we divided up the decorations and got all our supplies organized.

Last minute Mothers Day present! Stepping stones! Supplies all set up.

The tutorials I found on line suggested using either Vaseline or cooking spray as a mold release. You can probably tell we are using cooking spray.  It was quite the challenge to stir the concrete. Poor N was trying valiantly to hold the bucket while I stirred. He was laughing because the stirring was moving him around too.  With an impeccable sense of timing, Mr. Steam showed up right when I finished mixing the concrete. But he did help pour it into the molds.

The kids were a wee bit excited about the project. It cracks me up because N refuses to get his picture taken. But if he can photo bomb a picture then he’s all in. Goof!

Last minute Mothers Day present! Stepping stones! Excited to start decorating.


Then the kids got started decorating.

Last minute Mothers Day present! Stepping stones! Getting started.

Last minute Mothers Day present! Stepping stones! Getting started.

Both kids decided to do flowers. It made perfect sense as these are a gift for Grandma Garden.

Last minute Mothers Day present! Stepping stones!

N’s creation was all his own. He has a blue sky with white clouds and flowers.

Last minute Mothers Day present! Stepping stones!

Poor Ms M had a playground incident earlier this week where she fell face first onto a piece of equipment. She has been quite the sport about it and even has been wearing outfits to match the changing color of her nose. The missing teeth were not a result of the incident (thank goodness!).

She also wanted flowers, but we built here stone together. She did the grass, sky, and rain. I did the flowers and stems.

Last minute Mothers Day present! Stepping stones!


They were both very proud of their creations and can’t wait to give them to Grandma Garden.


Posted in Curious Crafts | Tagged , , | Leave a comment

QOV #2 for 2016 – Stars and Feathers

Remember how this year I was trying to pick out QOV quilts to that I could practice some edge to edge and all over quilting? When I picked up this quilt it was still in its bag and I was sure that this quilt was going to be a great candidate for an all over.

1 Quilt top

Not. Even. Close.

All that big wide open blue background. I had to do feathers. I just had to!

The border I decided to do some piano keys coming off 1/2 circle arcs. That fabric was way too patterned for anything to be seen.  On the corners I rayed out the keys. I knew I would never remember how to measure them out when I got to the bottom so I made myself a cheat sheet.

1 remembering border measurements

Even though I was very excited to put some feathers in that big blue space it took me MANY tries to figure out what would work. This drawing was about my 4th or 5th try.

2 Feather design

For as dark as the fabric was it was VERY hard to see the chalk lines. Those white lines on the fabric really proved to be a challenge. I had to concentrate REALLY hard to see.

3 Marking

In addition the pattern made it even harder to get  a picture of how the feathers turned out. Luckily, the quilt was sent with a solid background. Awesome!!!

Feathers

The setting triangles also proved to be a challenge to layout a spine that I liked. After MANY tries I ended up with this. So elegant.

5 marking setting triangles

And then I added feathers. Oh yeah! This quilt could take flight!

6 setting triangle feathers

Here’s a shot of the back. You can see it even better here. Plus you can see how I did the outer and inner borders.

7 border and triangles back

The fabric was really too busy to show up the feathers very well. But, it sure gave GREAT texture. And since the backing is solid, the recipient will get a really cool whole cloth. Two quilts in one. You can’t beat that!

8 texture


Posted in Quintisential Quilting | Tagged , , , | 4 Comments

Spooktacular Fun!

A friend of mine participated in a round robin. I don’t know how you feel about round robins, but they are nerve wracking for me. From my experience you either end up with a quilt that is greater than the sum of its quilters, or you end up with a disaster.

I think my friend’s round robin fell into the earlier. But you judge. (I promise the floor was very clean, we had just vacuumed before I put the top down.)

Halloween Round robin (2)

When I saw this top I asked my friend if I could quilt it for her. I knew the second I saw it how I wanted to quilt it. I was so excited when she said YES!!!!

I knew I wanted to treat each border a little bit differently. And I was going to be so much fun because both the black and green borders were solid fabrics and they were BIG! So there was going to be lots of room to play.

The outer most border was a very busy print, and it had a bit of fullness. So I used a 1″ piano key. It’s a quick and easy border and it great at eating up extra fabric.

In the black border was my first chance to play. I did a mix of pebbles, swirls and paisleys.

black border (2)

The broom got some variegated yellow thread to make it look more like straw.

black border (1)

I did all swirls off the back of the broom. That thing needed to look like it was flying after all.

black border (3)

The blocks were a lot of fun. The crazy log cabin blocks got a spiderweb. That was super quick to quilt up and required no marking or rulers. The characters got diagonal lines.

Blocks (1)

The green border had TONS and TONS of room to play. First I cut out some Halloween shapes from card stock.

green border (1)

green border (2)

Then I traced those with blue water erase marker. And quilted them.

green border

green border (5)

I just love how they look! Then I filled around them with McTavishing and pebbles.

green border (6)

I thought it would be fun to quilt in some steam and bubbles on the top of the cauldron.

green border (10)

The words got either echos or pebbles to help them pop.

green border (4)

The green was by far my favorite.

green border (11)

green border (80)

green border (82)

There wasn’t much room in the purple border, and there were some pretty tight spots around the ghosts. Pebbles are great for getting into tight spots and you can vary the size to make them more interesting.

Purple border

The most inner border had some interesting round flowers. I wanted to do some 1/2 circles, but I didn’t have a circle template. But I was REALLY REALLY determined to find a way. I had remembered reading about quilters using lids from pots. THAT’S IT! I went thru my craft supplies of small jars and found a spice jar lid that was just the perfect size!

circle template

The center panel I did some cross hatching, but of course I forgot to get pictures of that. -Sigh-.

I sent the quilt back to my friend and it was a hit! The cat even likes it!

Halloween Round robin

Posted in Quintisential Quilting | Tagged , , | 5 Comments

QOV #1 for 2015 – Jelly Roll Race

Normally when I pick out the QOV quilts to work on I pick out ones that have lots of room to play and that I can do fancy custom quilting on because that is what I enjoy so much. However, I almost never get a chance to do all over designs on quilts and I really want to make sure I practice that skill too. So this time when I picked out quilts I tried to pick out ones that were too busy to really see the custom work.

The first one I picked was a variation of a jelly roll race. It was a very cool quilt and really needed an all over pattern. I sampled several different all over designs, and ended up with a loop and star pattern.

005

However for the border I really wanted to do something different. I found a pin from “A Few Scraps” that are a no mark continuous line star that are PERFECT for borders.

004

From the previous pictures you really can see that the quilt is to busy to see the quilting. But… Fear not! The backing was solid red!

QOV Jelly Roll Race - Loops and stars

It was amazing to me how much faster this went than fancy quilting! It was only a few hours to finish the whole quilt. Its good to know I can to simple quilting in case I ever need to.

Posted in Quintisential Quilting | Tagged , , | Leave a comment